Customizable Reports
(Previously Data Exports)
Harness the power of your FunctionFox data with our new customizable reports feature under My Reports.
How to create a custom report
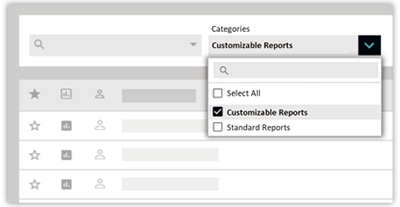
- Select "Customizable Reports" under the reports categories filter.
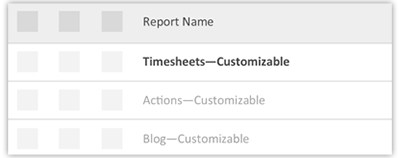
- Select the specific source. The data source is indicated in the report name (e.g Timesheets - Customize).
- Select your desired report parameters (e.g. Date - Year to Date).
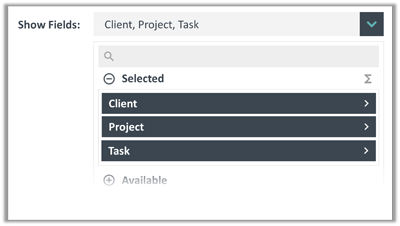
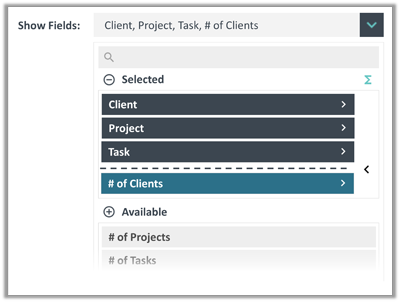
Customize your report by clicking on the Show Fields pick list
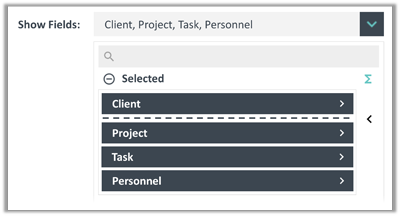
- Selected Fields: these are the fields (and column ordering) that the resulting report output will be display. In the example below Client, Project, and Task are our selected fields that will display for our report.
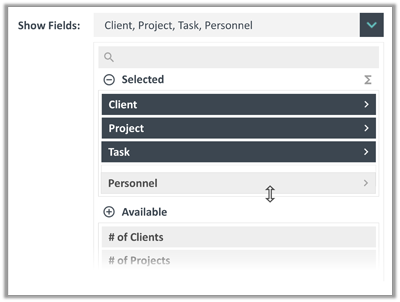
- Adding fields: you can add additional output parameters to your report be dragging the desired field from the "Available" area into desired position in the "selected" section (you can also double click the field to add to the selected area).
In the example below the personnel field is added to the output parameters.
Removing fields: you can remove any field by dragging it back to the "Available" section - or by double clicking the field.
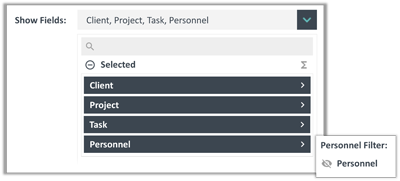
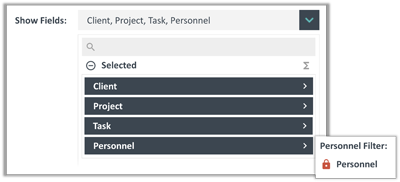
- Field Filters: When you are looking to make additional filters to one of your report parameters, click on the arrow icon (keyboard_arrow_right) next to the field you want to filter for, then click on the visible (visibility_off) to show the field.
In this example, we are applying an additional filter to the Personnel field. This is so we can narrow down our report to only show a specific person.
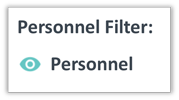
The visibility icon will turn teal (visibility) once enabled.
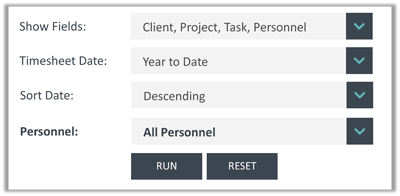
Your report form should now contain a Personnel pick list.
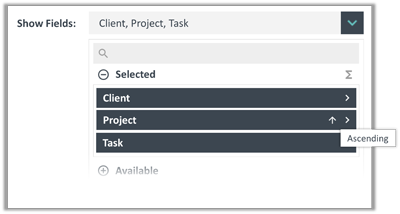
- Field Sort: you can sort any select parameter under the Show Fields area by toggling the Ascending/Descending arrow icons (arrow_upward) that appears when hovering over the field.
- Subtotals: you can add a subtotal to a selected field by clicking on the subtotal icon (functions), once enabled you will notice the icon will turn teal (functions) and a draggable arrow will appear.
Drag the arrow below the field for which you want the subtotal to be applied.
In this example, we are looking to subtotal by Client.
- Field Renaming: you can rename selected fields by clicking on show fields pick list, then clicking on the edit pencil (create) that appears when you hover your mouse over the field you want to edit.

- When you are satisfied with customizing your report click on the RUN button.
- Modifications: if you are wanting to make modifications to your current report parameters after you click RUN, click the CLOSE BACK button at the bottom of the report.
- Resetting: if you want to start from the default parameters for the report, click on the RESET button.
pets
FOX TIP: Having trouble finding the report that best highlights the data you need to see, or having issues with setting the report up? Contact our Success Team for assistance.
Other Features
- Rename Report Title: The report title can be updated either before or after running the report. To rename your report, click on the header title at the top of the page and rename your report. Once you’ve run the report, the saved report will appear under My Reports listing as: New Title Name ( Default Report Name - Customized ). Learn more about report renaming and creating templates by going to our My Reports article.
- Lock Field: in the event that you want to lock a certain field from being changed, you can toggle the visibility icon (visibility) to a padlock (lock). This can be done from the Show Fields pick list or from the report form.
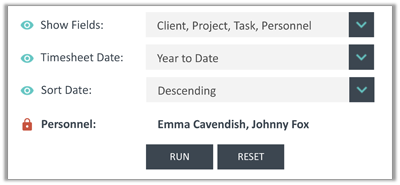
In this example, we are wanting to lock other users who may have access to a copy of this report (through the shared report feature) from changing the personnel field
You can see that the Personnel parameter is locked to "Emma Cavendish" and "Johnny Fox".
- Filtering Text fields: there are several ways in which to filter results for text fields:
- Enter in a list of words separated by a comma (e.g. Design,Development,Creative).
- Use the "%" wild-card to show similar words
- %value%: will include words that contain the value entered between the percents (e.g. %design% would return results Junior Design, Design-Senior).
- %value: will include results that end with the value entered after the percent (e.g. %design would return junior-design and senior-design but not design-proof or designer).
- value%: will include results that begin with the value entered before the percent (e.g design% would return design-proof and designer but not junior-design).
Additional Notes
- GTE: Greater than or equal to.
- LTE: Less that or equal to
- PT: Pacific Time
- Aggregate Values: you may notice some of the field parameters are shaded in Grey (under Available) and will turn to Blue (under Selected). These parameters are aggregate values, where you cannot apply a further subtotal below these fields.
- click visibility_off /visibility in the upper right hand to show/hide all fields.
What’s Next
See how to manage your custom reports in the My Report Listings.